So far we explored how to modify tables in PostgreSQL using the ALTER command. We covered how to create tables, create columns, and add constraints to tables. These modifications can be useful when the structure of the database needs to be changed or updated.
Overall, these are important skills to have when working with PostgreSQL databases, as they allow for efficient data retrieval and management.
At this point, we have successfully created three tables in our geeksveda2 database: courses, users, and purchase_items. Now, we can move on to learn how to retrieve data from these tables.
Connecting to PostgreSQL Database
To do this, we will use the geeksveda database that we create in the lesson – List PostgreSQL Databases and Tables Data Using PSQL Command.
To connect to the geeksveda database, simply enter the command:
$ psql --dbname geeksveda
OR
\c geeksveda
If the connection is successful, you should see a message that says “You are now connected to the geeksveda database as user postgres.”
PostgreSQL SELECT Statement
The SELECT command is used to retrieve data that has been previously entered into tables. This command is typically used to display data on web pages or applications or to keep a copy of it.
SELECT column1, column2, ...
FROM table_name;
To retrieve data from a specific table, replace “table_name” with the name of the table. To see all the tables within a database, use the command “dt”. For example:
This will show a list of relations in the database, including the table’s name, type, and owner.
To retrieve specific columns from a table, use the command "\d table_name" to display a list of columns within the table. For example:
\d users
This will show a list of all the columns within the “users” table, including their names, types, and whether or not they can be null.
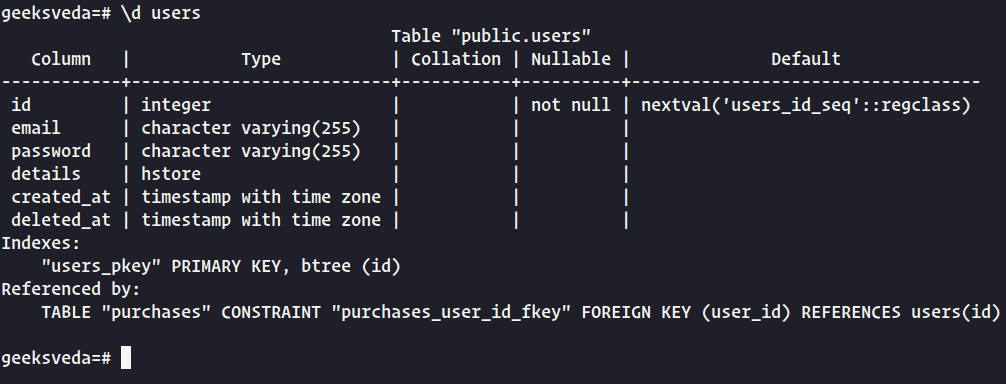
To retrieve data from a specific column, use the SELECT command followed by the name of the column.
SELECT email FROM users;
The above command will retrieve the “email” column from the “users” table and display it.

To retrieve multiple columns, separate the column names with commas.
SELECT email, id FROM users;
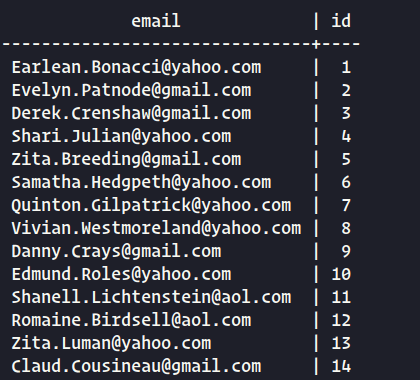
This command will retrieve both the “email” and “id” columns from the “users” table and display them. It is important to ensure that the column and table names in the query match those in the database, or an error will occur.
Merge Data in PostgreSQL
When data is added to a database, it is organized in a structured manner to facilitate future use, whether for searching, modifying, or displaying. For instance, to store a user’s name, we would typically put their first name in one field and their last name in another.
It’s important to exercise caution when merging different types of information because doing so can yield inaccurate results. This is because there are various ways to combine data, each of which is suited to a particular type of information.
For example, merging two text fields into a single text field requires a different method than merging two numeric fields into a single numeric field. Therefore, it’s crucial to consider the type of data being merged and use the appropriate method to ensure accurate and useful results.
Merging Column Values
When working with numbers, we can use symbols such as (+), (-), (*), and (/) to perform arithmetic operations and obtain the result.
SELECT column1 + column2 ...
However, when working with text values that need to be combined, we can use the CONCAT() function.
SELECT CONCAT(column1, column2, ...)
As an example using our database, if we need to merge the “email” column with the “id” column, we can use the following command:
SELECT CONCAT(email, id) FROM users;
This command will display the merged columns as a single column called “concat“.

To customize the name of the resulting column, we can use the AS keyword followed by the desired name, like this:
SELECT CONCAT(email, id) AS "email_id" FROM users;
In PostgreSQL, we use double quotes to create column names, table names, and roles. However, we use single quotes for strings. The resulting column, “email_id“, will display the merged values of the “email” and “id” columns.
The command will yield the following result:

Remember to use the appropriate syntax when dealing with different data types to obtain the desired results.
Modify Tables in PostgreSQL
After creating a table, we can modify its properties using the ALTER keyword. This allows us to make changes to the table’s structure and properties. Some of the key modifications that can be made include:
To begin, let’s connect to the “geeksveda2” database using the command.
\c geeksveda2
Then, we can use the "\dt" command to display all the tables within the database.
\dt
The result will be displayed as follows:
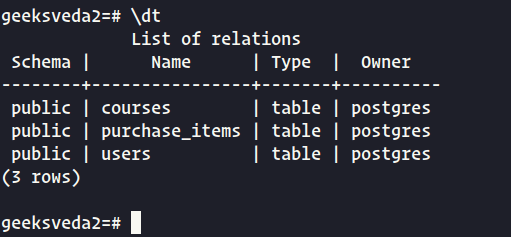
Once we have identified the table we want to modify, we can use the ALTER TABLE command followed by the table name to make changes. For example, to add a new column to the “users” table, we can use the following command:
ALTER TABLE users ADD COLUMN phone_number VARCHAR(20);
This will add a new column called “phone_number” to the “users” table with a data type of VARCHAR and a maximum character length of 20.
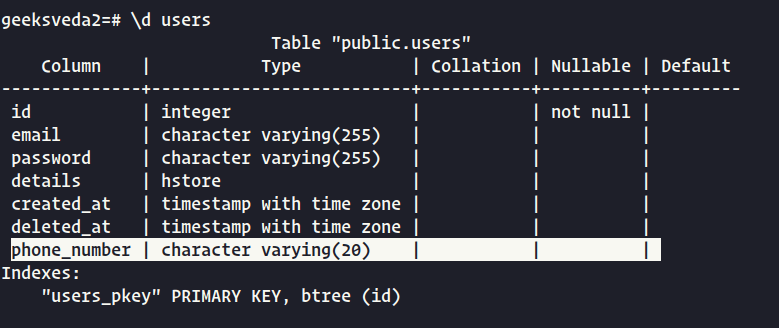
We can also modify the data type of an existing column using the ALTER TABLE command. For example, to change the data type of the “phone_number” column to an integer, we can use the following command:
ALTER TABLE users ALTER COLUMN phone_number TYPE integer USING phone_number::integer;
This command will change the data type of the “phone_number” column to an integer and convert any existing values to integers using the "::integer" syntax.
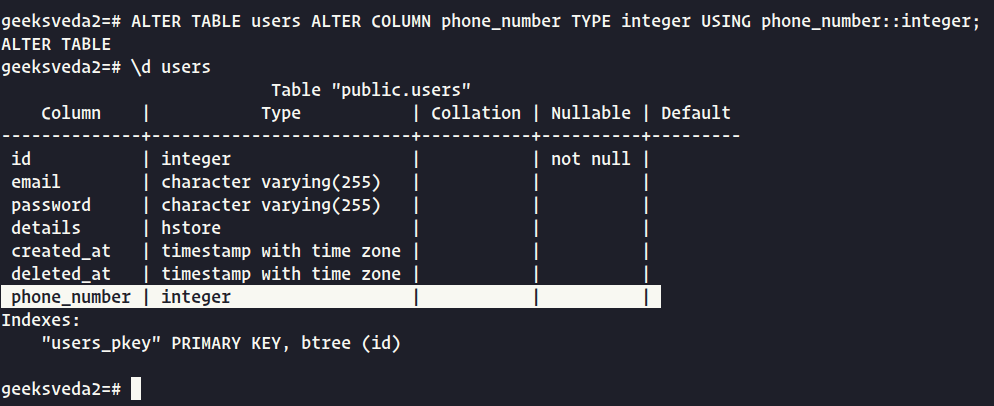
In addition to adding and modifying columns, we can also add or remove constraints, rename columns, and more using the ALTER TABLE command. It’s important to use caution when modifying tables to ensure that the changes are appropriate and do not negatively impact the data within the table.
Update Table Name in PostgreSQL
To modify a table in our database, we can use the ALTER TABLE command followed by the table name and the desired modification. For example, to rename the “users” table to “all_users“, we can use the following command:
ALTER TABLE users RENAME TO all_users;
This command will change the name of the “users” table to “all_users“. To confirm that the table has been renamed, we can use the "\dt" command to display a list of all relations within the public schema.
\dt
The result should be displayed as follows:
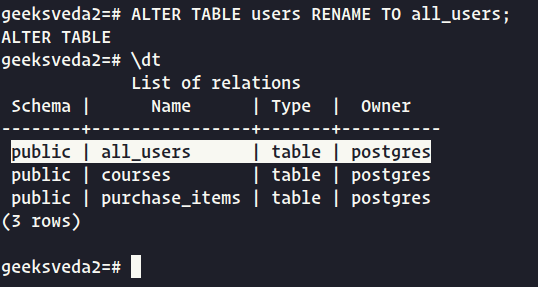
As shown above, the “users” table has been successfully renamed to “all_users“. It’s important to note that when renaming a table, any references to that table in other parts of the database (such as queries or stored procedures) will need to be updated accordingly to ensure that they continue to function correctly.
Modify Column Name in PostgreSQL
To modify a column within a table, we can use the ALTER TABLE command followed by the table name and the desired modification. For example, to rename the “details” column to “description” within the “all_users” table, we can use the following command:
ALTER TABLE all_users RENAME COLUMN details TO description;
This command will rename the “details” column to “description” within the “all_users” table. To confirm that the column has been renamed, we can use the "\d" command followed by the table name to display the table’s schema.
\d
The result should be displayed as follows:
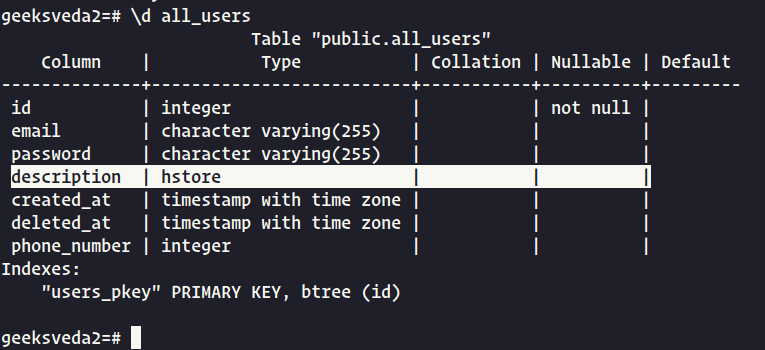
As shown above, the “details” column has been successfully renamed to “description” within the “all_users” table. It’s important to note that when modifying a column, any references to that column in other parts of the database (such as queries or stored procedures) will need to be updated accordingly to ensure that they continue to function correctly.
Add Columns to a Table in PostgreSQL
To add a new column to a table, we can use the ALTER TABLE command followed by the table name and the ADD COLUMN clause. For example, to add a new column called “address” of data type character varying with a maximum length of 1024 to the “all_users” table, we can use the following command:
ALTER TABLE all_users ADD COLUMN address character varying(1024);
This command will add a new column called “address” to the “all_users” table with a data type of character varying and a maximum character length of 1024.
To confirm that the column has been added, we can use the "\d" command followed by the table name to display the table’s schema.
\d
The result should be displayed as follows:
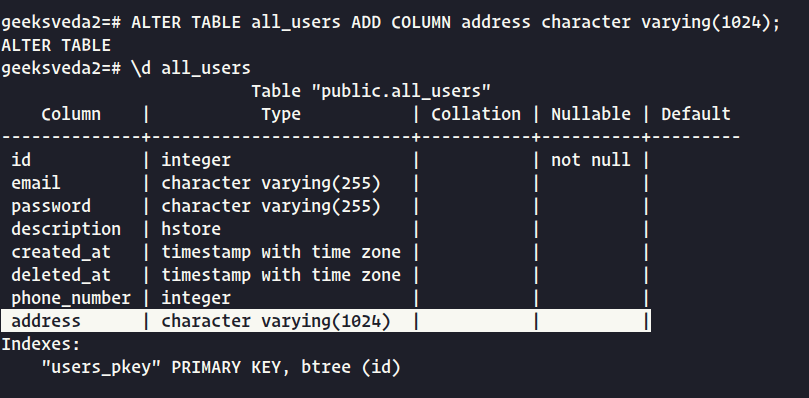
As shown above, the “address” column has been successfully added to the “all_users” table. It’s important to note that when adding a column, the new column will be added to the end of the table’s column list unless a specific position is specified using the AFTER or BEFORE clauses.
Conclusion
To summarize, in this post, we learned how to retrieve data from tables in a PostgreSQL database using the SELECT statement. We began by connecting to the database and listing all the tables within it. Next, we used the SELECT statement to retrieve data from a specific table, focusing on retrieving specific columns of data.
By using various clauses such as WHERE and ORDER BY, we were able to refine our queries and retrieve only the data that we needed. Overall, understanding how to select and retrieve data from tables is a fundamental skill for working with PostgreSQL databases.
