In our SQL series, so far we have discussed the method to create a table and insert values into it. More specifically, working with databases fundamentally involves retrieving data from a database.
So, now, it’s time to enhance your database analysis techniques!
You can retrieve data based on specified criteria and sort it in a particular order using the SQL SELECT statement. It assists in retrieving all column values, specific columns, filtering data, sorting data in ascending or descending order, and also enables you to join multiple tables together.
In this post, we will go over the syntax of the SQL SELECT statement and how to utilize it wisely in different case scenarios and also enlist the best practices for using it.
1. What is SQL SELECT Statement
The SQL SELECT statement belongs to the database query language that is utilized for retrieving or fetching data from the selected table of the database. Moreover, you can use this statement for selecting and retrieving records from single or multiple databases.
It also permits the users to specify which columns should be included in the result or define any condition or criteria that have to be applied for filtering data.
Follow the provided syntax for using the SQL SELECT statement.
SELECT col1, col2, col3, ...
FROM table_name
WHERE condition;
Here:
- The “
SELECT” statement is utilized for retrieving data, followed by the columns set “(col1, col2, col3)“, separated by commas. - The “
FROM” keyword refers to the “table_name” from which the records need to be accessed or fetched. - The “
WHERE” clause assists in filtering the data based on the defined “condition” or criteria.
Now, let’s check out how to practically use the SQL SELECT statement!
2. How to Use SQL SELECT Statement
The SQL SELECT statement is mainly utilized in the below-given scenarios.
- For retrieving all data from a table.
- For retrieving specific columns from a table.
- For filtering data based on a condition.
- For joining data from multiple tables.
- For sorting data in ascending or descending data.
While moving ahead, we will utilize the same tables, which we have created in the SQL CREATE TABLE statement post, and then insert values into it later.
2.1 Retrieve Data From a Single Table
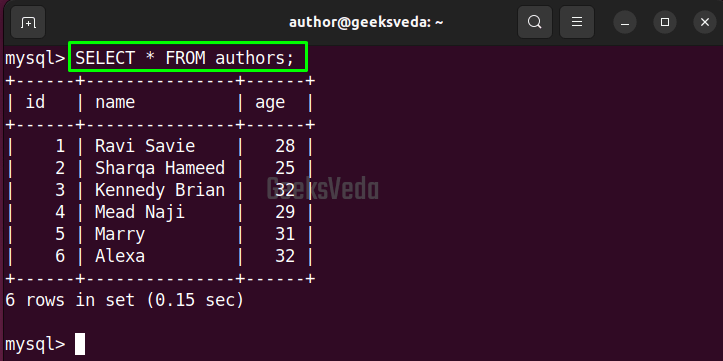
Retrieving or accessing all data from a table can assist in understanding or analyzing the complete dataset, creating a full backup of a database, debugging SQL queries, or making sure that you have a complete data set to migrate.
To retrieve all data from a table, use the SELECT statement, and specify “*” representing all columns, write out FROM keyword, and then mention the table name as we typed “authors“.
SELECT * FROM authors;
2.2 Retrieve Specific Columns Data From a Table
While working with SQL databases, sometimes you may want to reduce or limit the amount of data retrieved or simplify data analysis. In such a scenario, SQL permits the fetching of particular columns from a table.
This can also improve the overall query performance and can also prevent unauthorized access to sensitive data.
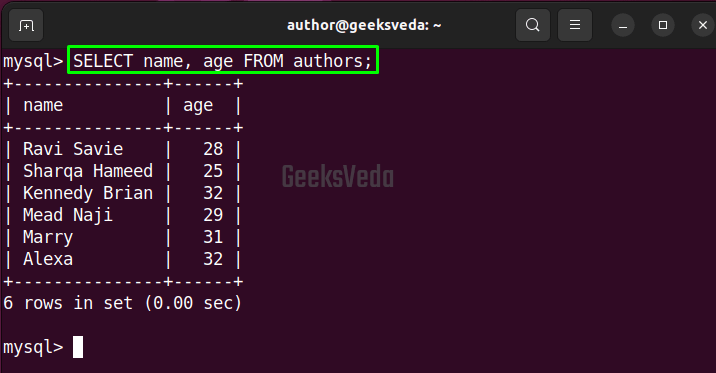
For instance, we will now only select the “name” and “age” columns of our “authors” table.
SELECT name, age FROM authors;
2.3 Filter Rows Based on a Specified Condition
In the previous example, we have seen the example related to fetching specific columns from tables. Now, let’s have a look at the method to filter data and fetch specific column values from a table in SQL.
To do so, type out the provided statement.
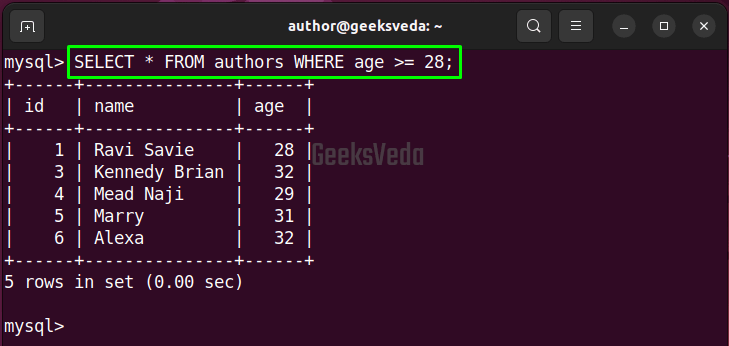
SELECT * FROM authors WHERE age >= 28;
The given SQL SELECT statement filters the records where the age value is greater than or equal to 28 and displays them.
2.4 Join Multiple Tables in SQL
Joining data from multiple tables is another operation that can be performed with the help of the SQL SELECT statement. This can be utilized when the data is stored in multiple tables and you need to combine the data for getting the desired result.
Moreover, joining data from multiple tables can also assist in generating more informative and meaningful reports.
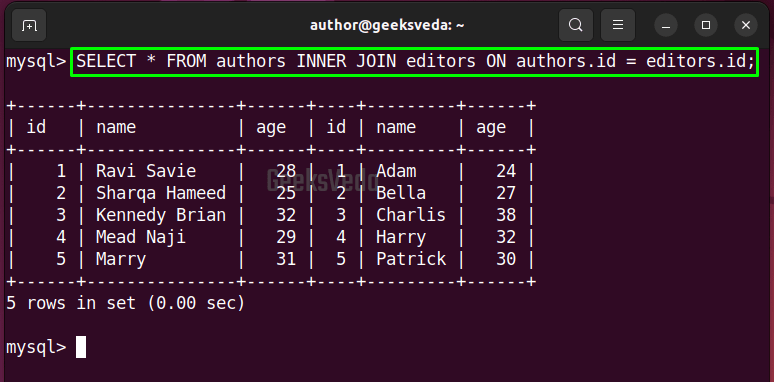
The following SELECT statement retrieves all columns from the “authors” and “editors” table that has been joined together using the common column named “id“.
SELECT * FROM authors INNER JOIN editors ON authors.id = editors.id;
The output will display the rows where the id column of the authors table gets matched with the id column of the editors table. More specifically, the “INNER JOIN” defines that only the matched rows will be defined.
2.5 Sort Data in SQL Ascending or Descending Order
In SQL, sorting data can assist in easily identifying the trends or patterns of large datasets. It rearranges the results in a logical order which enables the data to be more organized and analyzed efficiently.
Sorting data in ascending or descending order can let you identify the outliers, highest or lowest values, and other important data points.
Ascending Order with SQL Order By
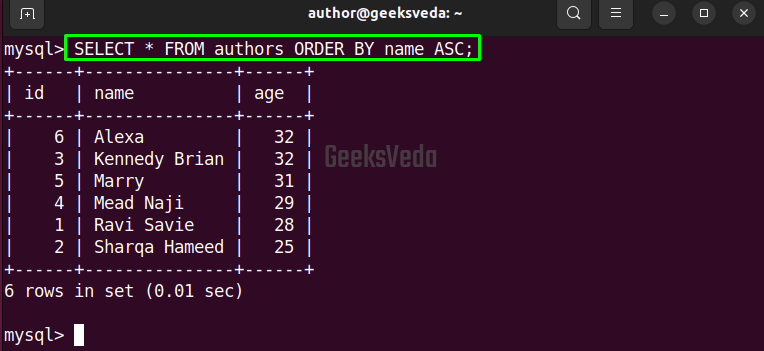
For example, the provided SQL SELECT statement will sort out the column values of the authors table in ascending order with respect to their names.
SELECT * FROM authors ORDER BY name ASC;
Here, an ORDER BY clause is added to specify the column “name” based on which we will sort the data in ASC or ascending order.
Descending Order with SQL Order By
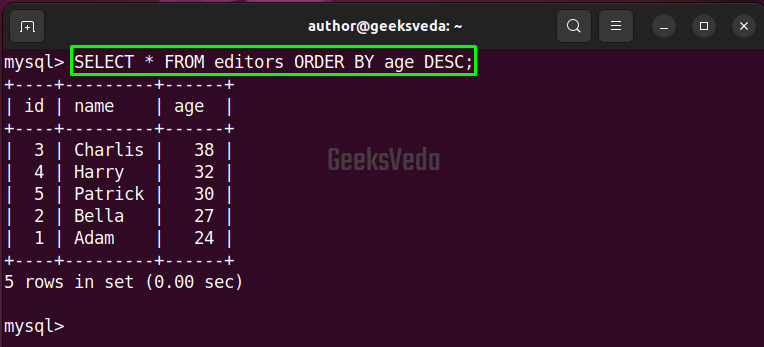
Another approach is to specify the “DESC” keyword for sorting the rows in descending order on the basis of the integer type column such as “age“.
SELECT * FROM editors ORDER BY age DESC;
3. Common Errors When Using SQL SELECT Statement
Now, let’s discuss some of the common errors that can be faced while using the SQL SELECT statement and their relevant fixes.
3.1 Fix ERROR 1064 (42000)
Syntax errors can occur when you have used misspelled keywords or incorrect syntax in the SELECT statement, forget to add column names, or a semicolon at the end of the statement.
For instance, we have not added any column names before the FROM keyword in the provided statement. Therefore, it will display the SQL ERROR 1064 (42000).
SELECT FROM authors;
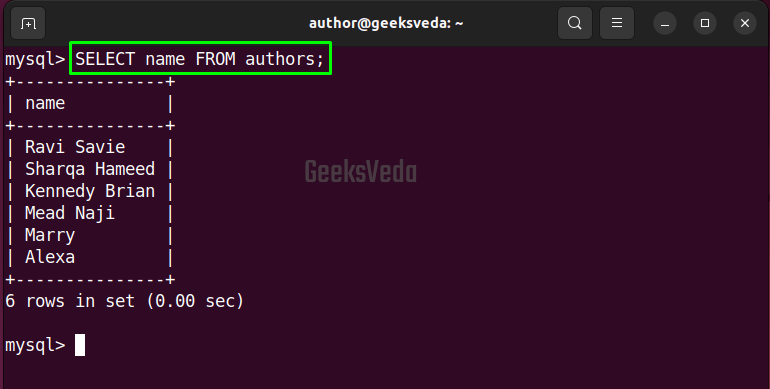
As a solution, we will now add the column “name“.
SELECT name FROM authors;

As a solution, we will now add the column “name“.
SELECT name FROM authors;
3.2 Fix ERROR 1054 (42S22)
The mentioned error can be encountered when the specified column name does not exist in the table. The reason behind this can be a spelling mistake or maybe you have mentioned the incorrect column name.
We have now intentionally specified “author_name” as the second column name which is not present in the authors table.
SELECT id, author_name FROM authors;
As a result, the SQL ERROR 1054 (42S22) will occur stating that the column name does not exist in the field list.

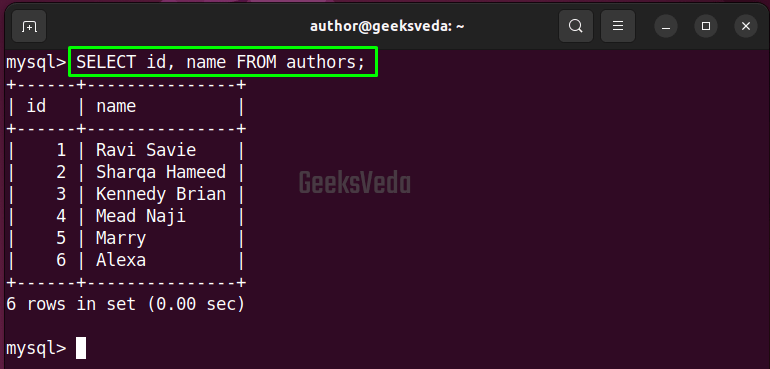
Instead of “author_name” specifying “name” as the second column name will display the desired output.
SELECT id, name FROM authors;
3.3 Fix SQL ERROR 1052 (23000)
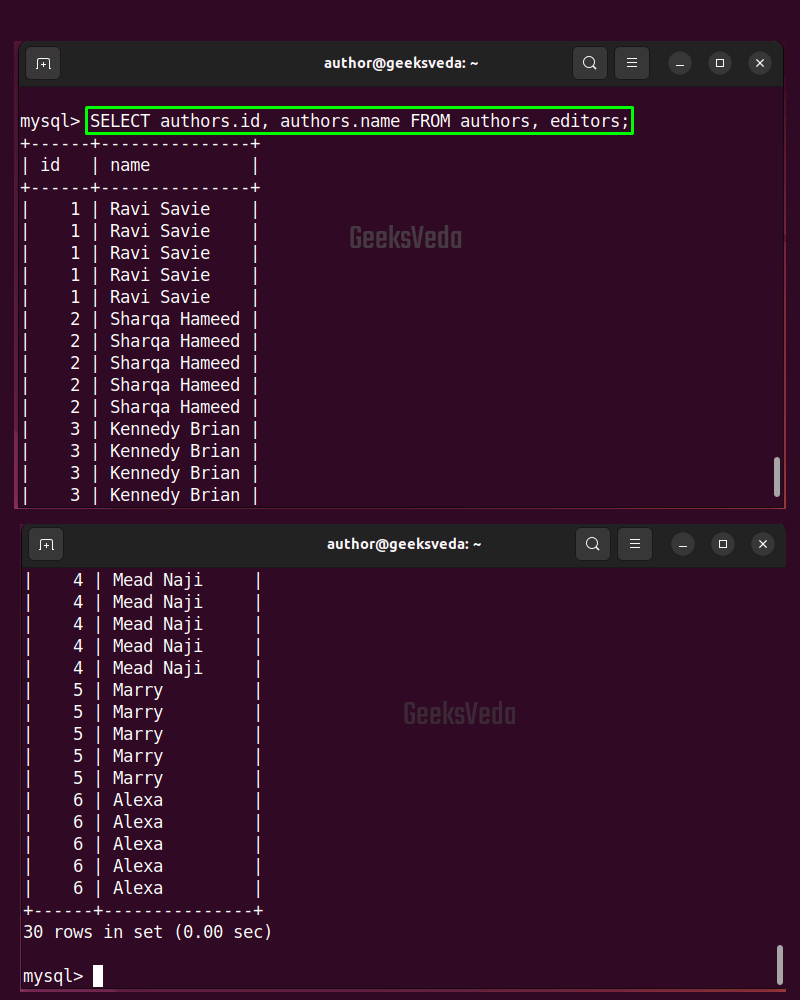
SQL ERROR 1052 (23000) can occur when the column name has been found in the multiple tables mentioned in the query and the database engine cannot figure out which table to use.
Both “authors” and “editors” have the same column names “id” and “name“, so the database engine won’t be able to determine which table to utilize and show SQL ERROR 1052 (23000).
SELECT id, name FROM authors, editors;

To resolve this error, qualify the column name with the table name as follows.
SELECT authors.id, authors.name FROM authors, editors;
3.4 SQL Data Type Mismatch
A data type mismatch error can occur when the specified column data type is not equal to the actual one.
For example, the data type of the “age” column is “INT“. However, we have passed the age value as a string in the following SELECT statement.
SELECT * FROM authors WHERE age = 'thirty two';
As a result, the output will indicate the empty set rather than fetching the values from the table.

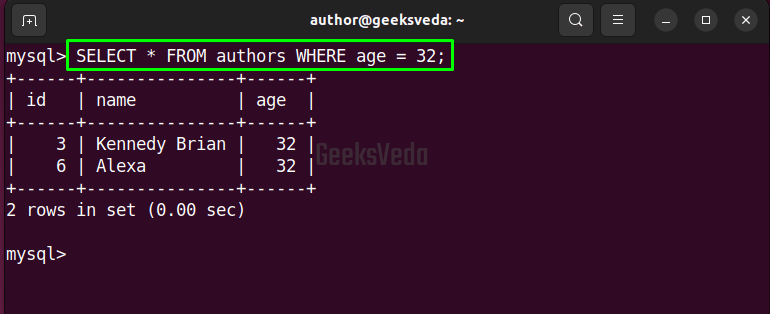
To fix it, mention the correct data type of the value being compared.
SELECT * FROM authors WHERE age = 32;
Now, you can see the fetched data.
4. Best Practices for Using SQL SELECT Statement
Have a look at the best practices for SELECT statement usage.
- Utilize
SELECT *sparingly (to do something in a restrained or limited way0. - Use
specific column nameswhen required. - Use
table aliasesfor readability. - Only
SELECTthe necessary columns. - Use
WHEREclause for filtering data. - Use
ORDER BYfor sorting data. - Avoid using unnecessary sub-queries.
- Test queries before running them in procedure to ensure efficiency and accuracy.
That was all essential information regarding the use of SQL SELECT statements.
Conclusion
The SELECT statement is considered a fundamental concept in database management. By understanding its syntax and utilizing best practices, you can retrieve or fetch the data you need quickly and efficiently, as per requirements.
Keep learning and keep exploring GeekVeda and stay tuned for new content in this SQL series!
